
Outline:
- Introduction
- Pinpoint the drawbacks of using image icons
- Importance of using SVG icons
- What drives me to share this strategy
- Tools and libraries needed
- The strategy
- Convert image icon to SVG icon
- Convert SVG icon to React component
- An example os using SVG component in a react app
- Comparison between image and icon concerning performence
- Conclusion
Introduction
Application performance without any doubt is one of the key factors of making your app successful, and encourage your clients to stay and engage with the app for a long time.
One of the application areas where performance can be affected, is when your applications contains many images, and more precisely image icons within buttons and sidebars and navigations with little bigger size and the images not loaded as quickly as they should.
You start to see the effect of this when the user has a slow internet connection, and the application render the content without icons for a bit until the request for spread image or icons fetched from the server. One of the solutions for this issue is using SVG icons to improve the performance, and display the icons on your app immediately when the page DOM painted, and use it as React component.
What drives me to share this strategy
Sometimes, you need an icon to use in your application, and you just find the image version of this icon, or the image repository does not offer an SVG version of it, and a lot of image repositories these days only give you SVG icons if you have a PREMIUM account which makes it hard for developers to find appropriate icons in SVG format.
For that reason, I was thinking of a way to generate SVG icons from image icons to use them in my apps, and this startegy is not concerning icons only, but also logos and images, and the generated svg can be customized if you want to twist it to match your needs.
Forcing developers to pay for SVG icons, the lack of pre-made professional SVGs icons, and the flexibility of using icons as React components are the mean reasons for writing this blog post and share with you what I know.
Tools and libraries needed
-
- Adobe Illustrator: This is the tool that will take the icon as an image and turn it into SVG
-
- React: We need react environement to be set in order to use our SVG icon as a component
You have to install the above software and get your React app up and ready before proceeding the tutorial. I know you may ask, well do I really need a huge program like Adobe Illustrator to just convert image icons to SVG !? But trust me, when you start familiarize with it, the process become easy and you start use it in other use cases like making logos and images and improve your app performance.
The strategy details
* Startegy timeline history
Once upon a time, you feel like you need an icon on your app, let’s take an example of a notification icon, you go to the internet, and you search for notification icons, but you didn’t find any appropriate svg icon. Let’s say you find a good icon but as png or jpeg image (or any other image format). What to do next !? Well download the image icon and follow along with me to show you how you can convert it to React component.
1. Download the image icon
Here is the icon that I like to add in my React app, so I downloaded it:

1. Convertion step
Open Adobe Illustrator program and create a new item as shown in the following screenshot:
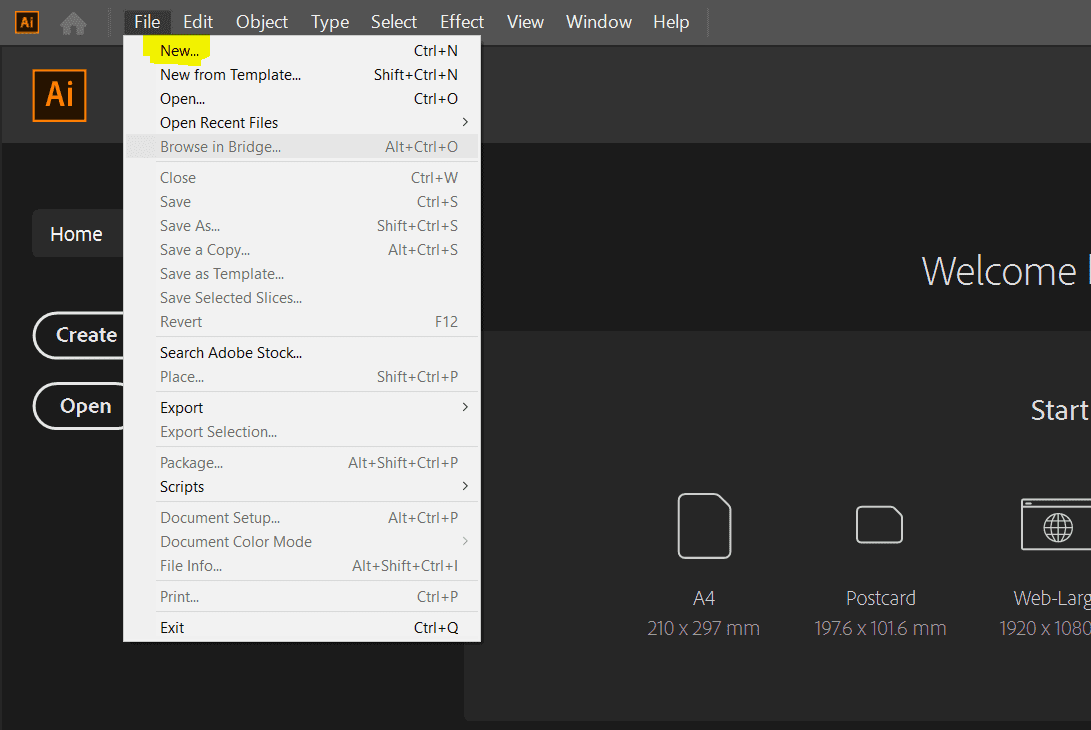
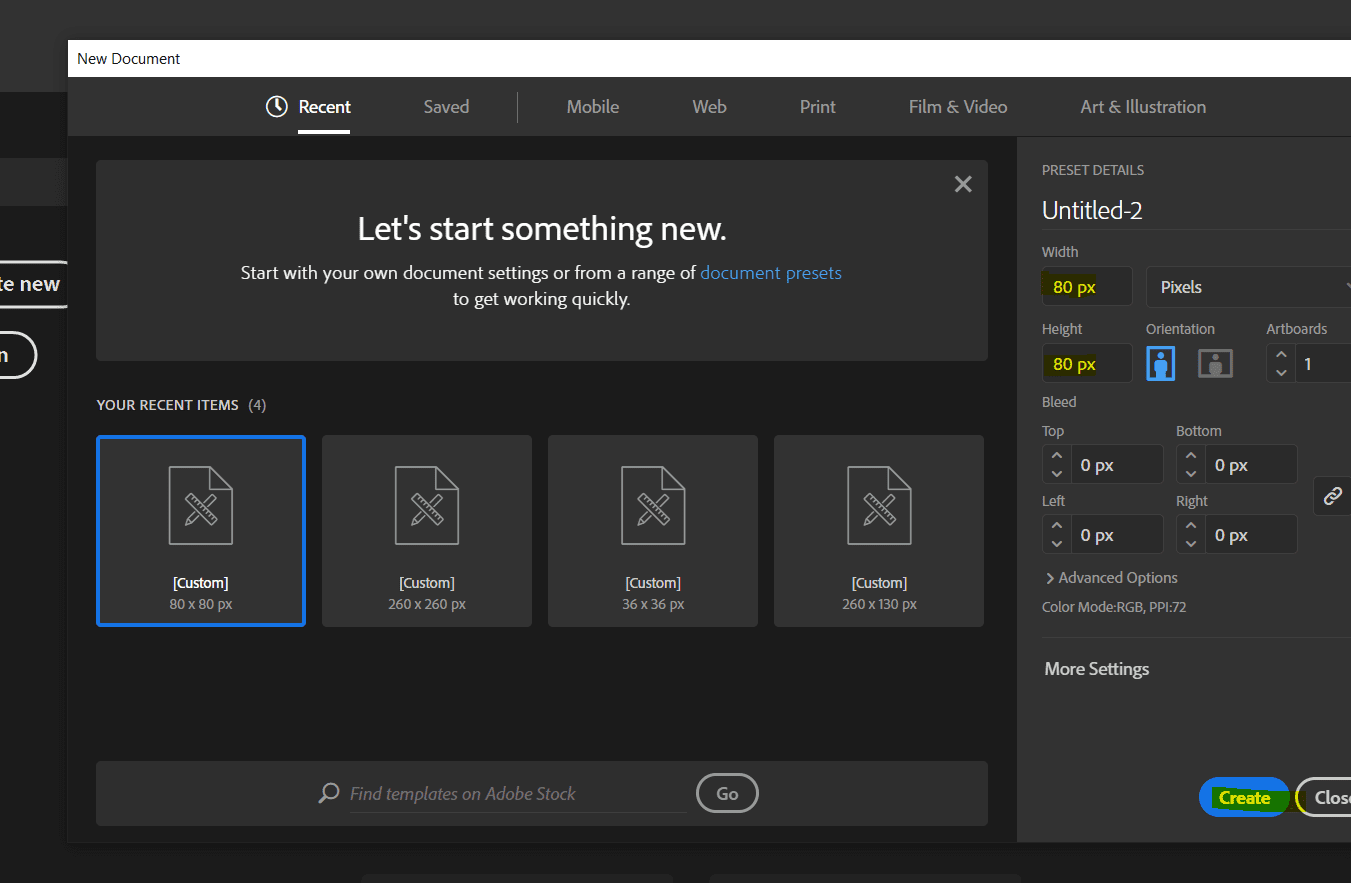
Select dimensions of your layer
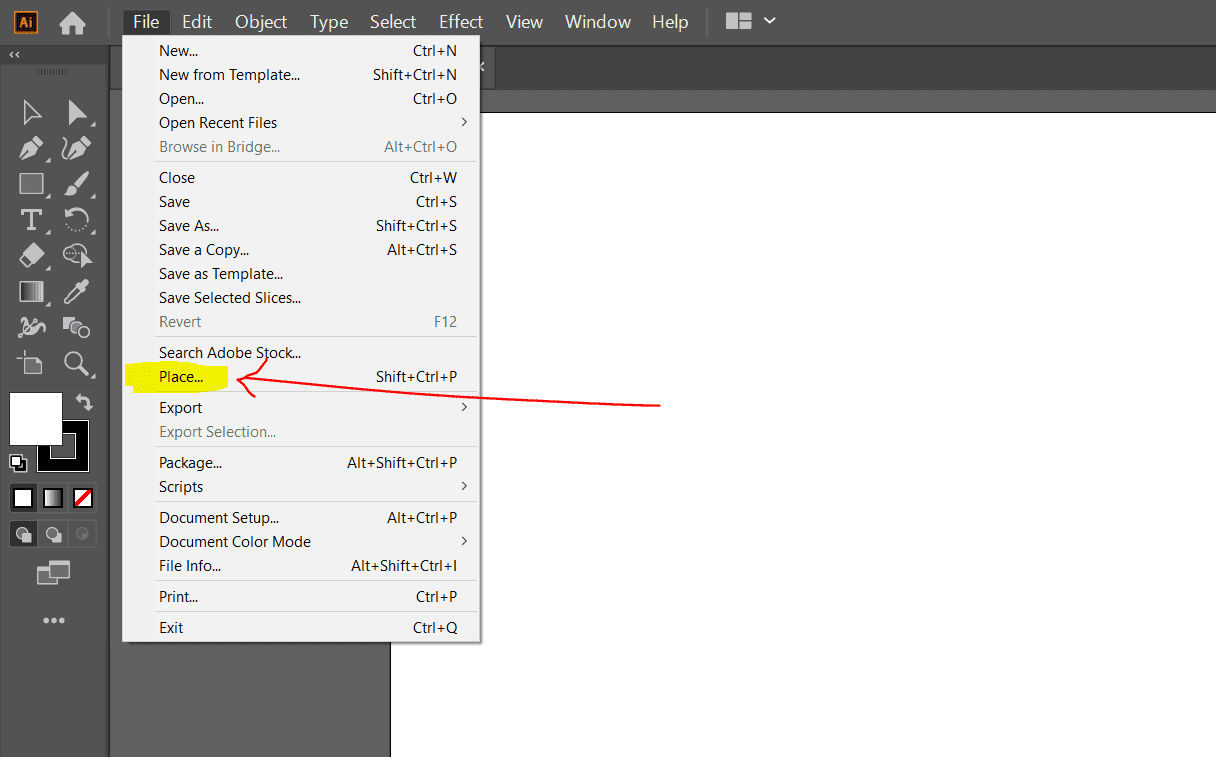
Then click on File -> place and select your image icon to import it:
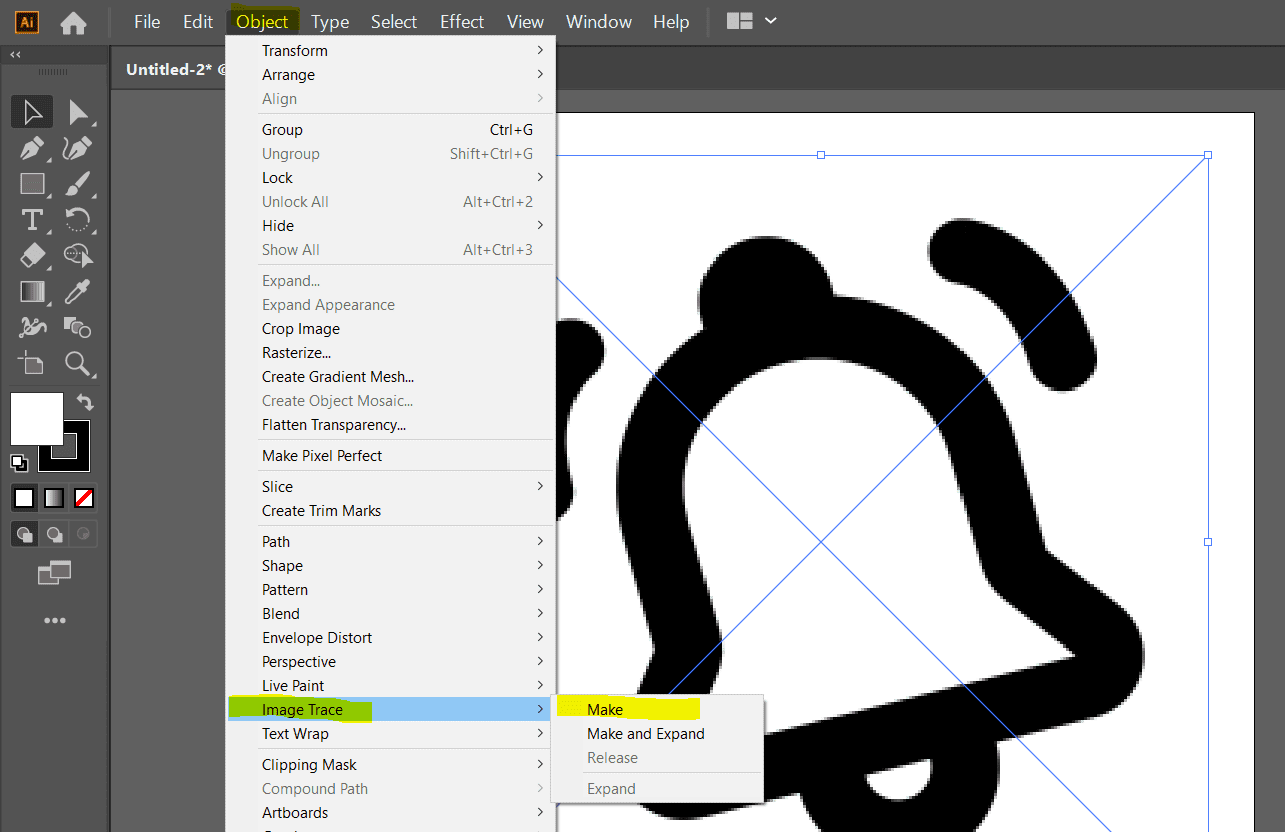
Adjust you image to fit the dimension you want, and then go to
Object -> Image Trace -> Make like following:
Then, look in the right sidebar, if the Image Trace tab is not present, you have to go to
Window -> Image Trace to show it:
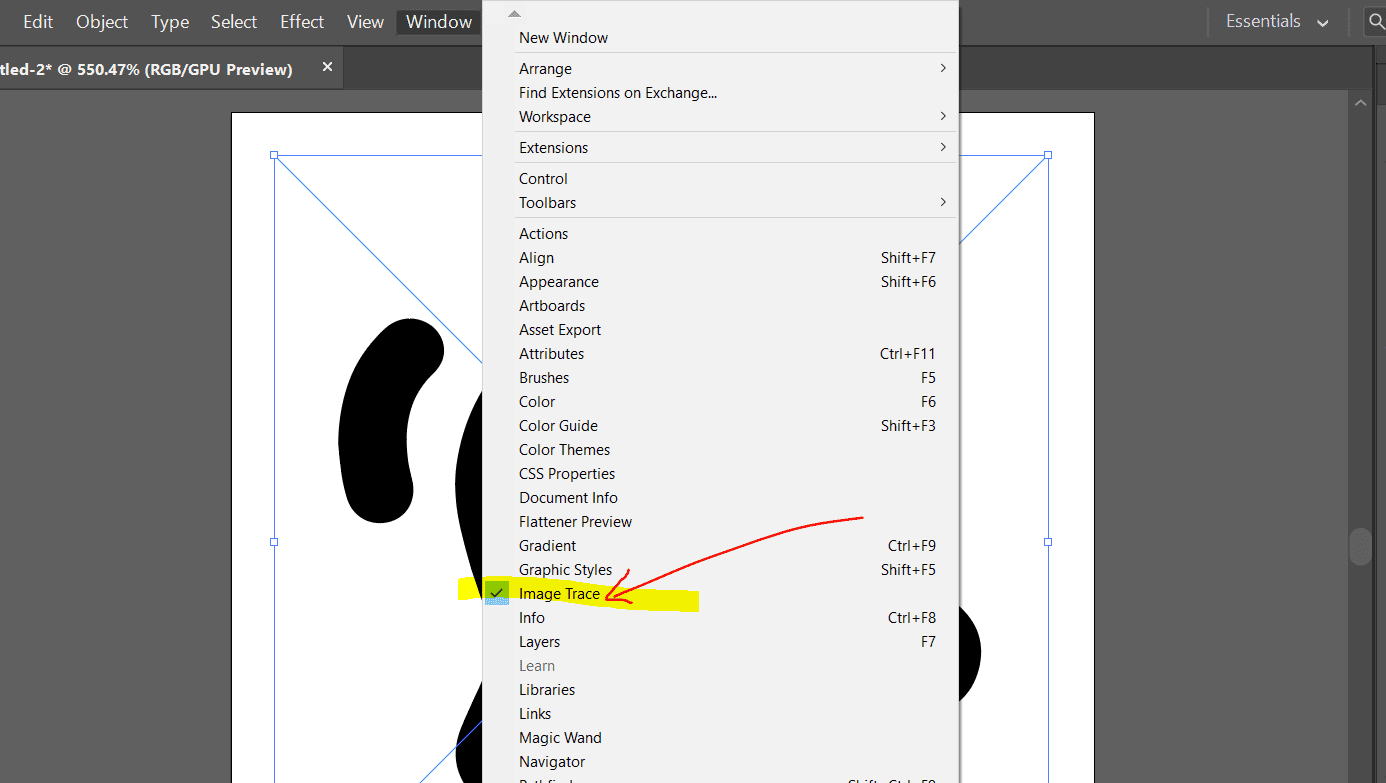
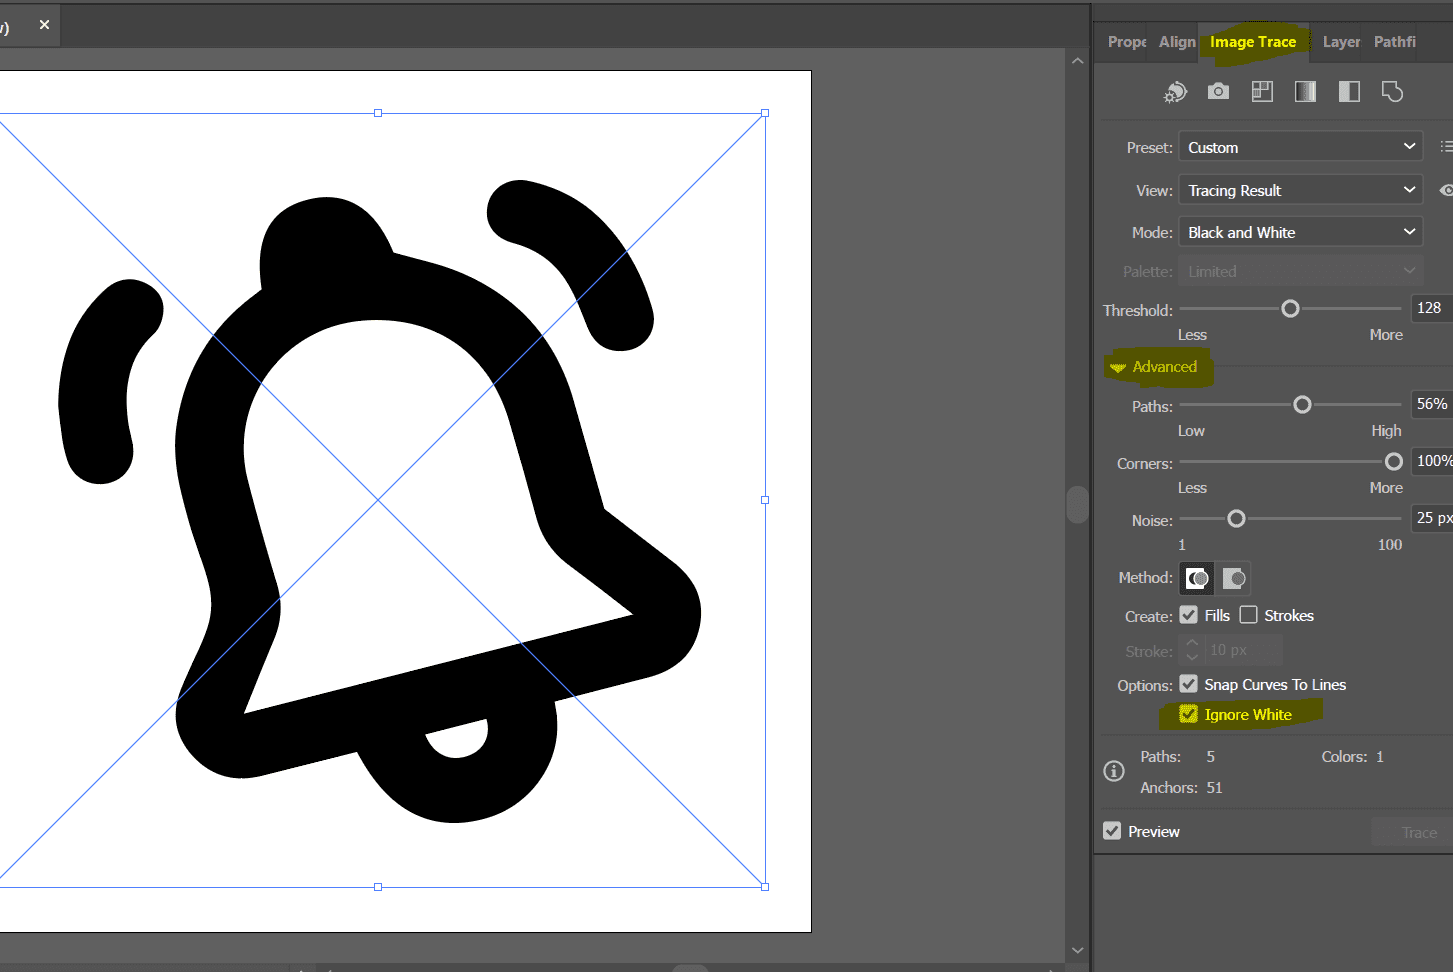
After showing Image Trace tab, Toggle Advanced area, and check the Ignore whites, and configure the settings like paths and corners to as you like.
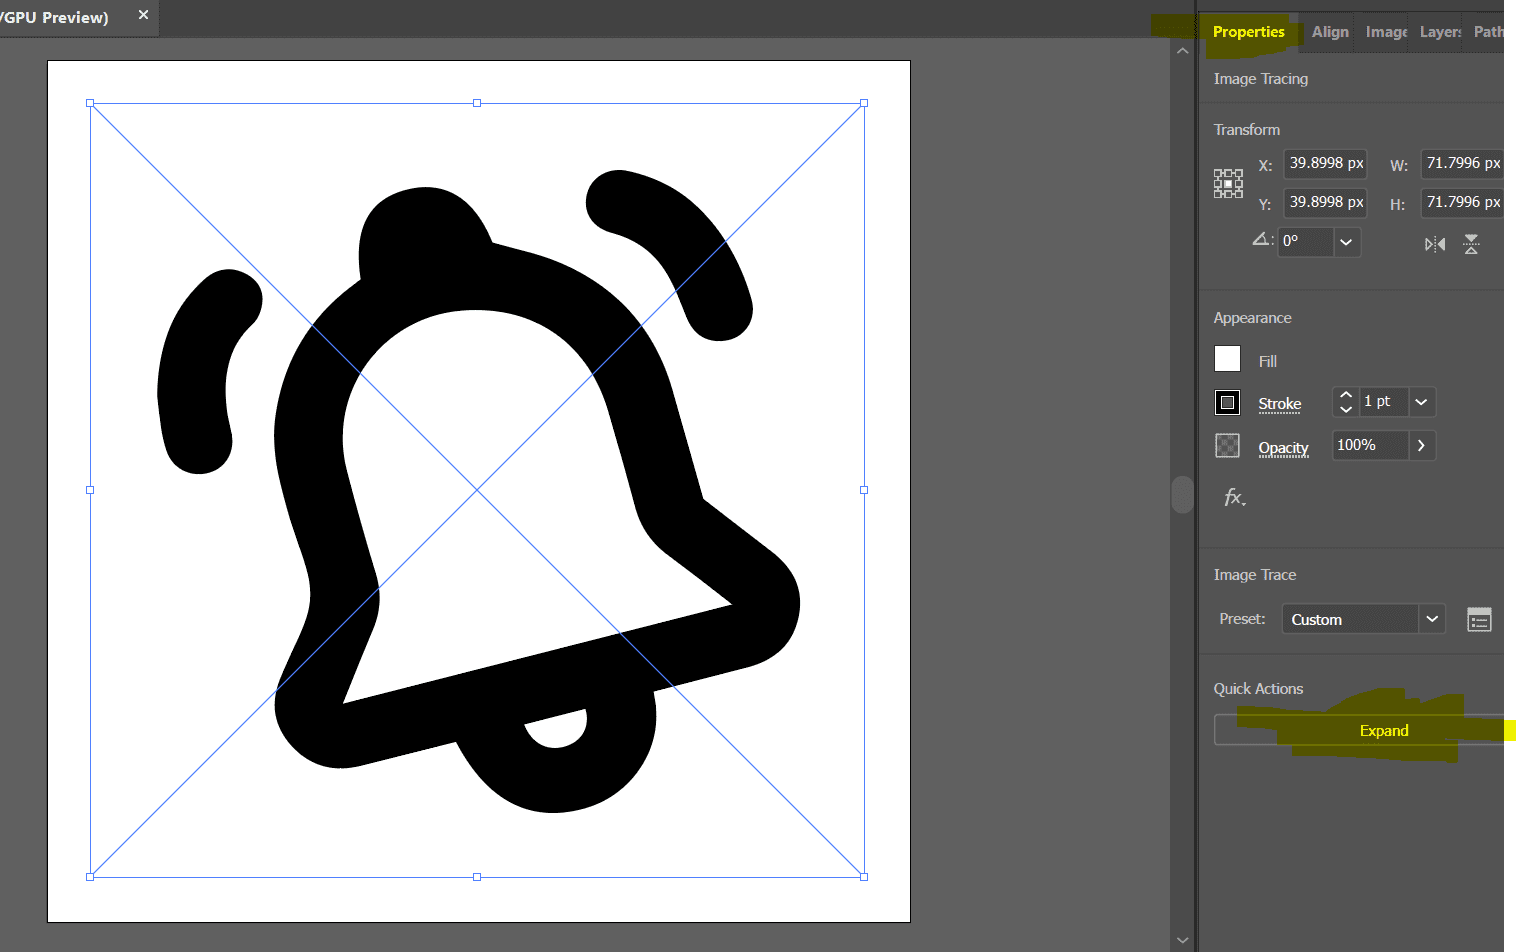
When you done with Image Trace configuration, switch back to Properties tab, and click on Expand button.
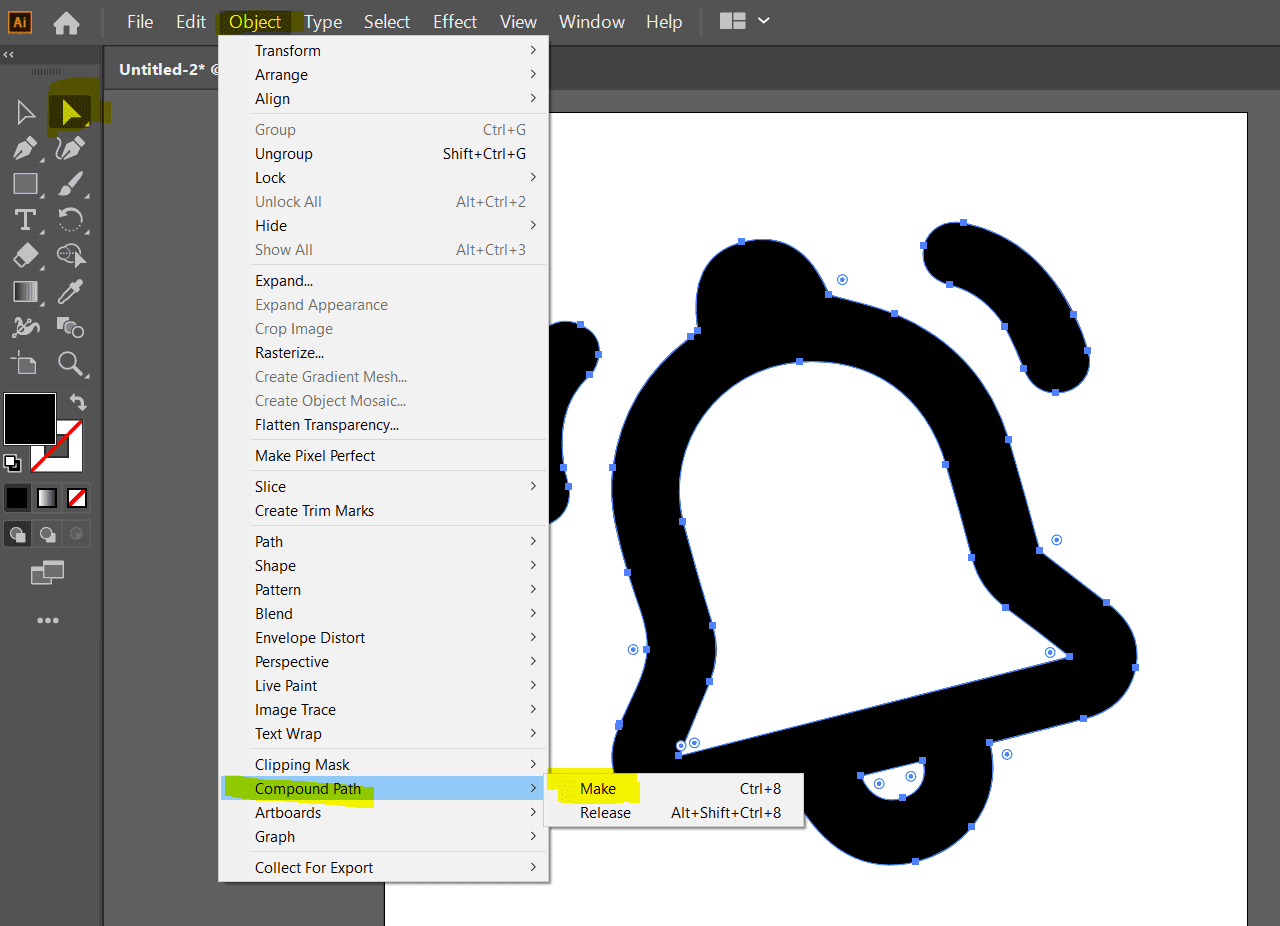
If your icon has multiple connected paths (we have here 3 connected paths: the bell and the two other lines above it), you have to do the next step, otherwise, if your icon is as simple as a single path, then skip the following step.
You have to select your complete icon paths using the direct selection tool (shown in the left panel), and then go to:
Object -> Compound Path -> Make to make it as a single path.
Then, you have to center your icon horizontally and vertically by going to:
Window -> Align to show Align tab, and then click on the center horizontally and vertically as shown in the following shot:
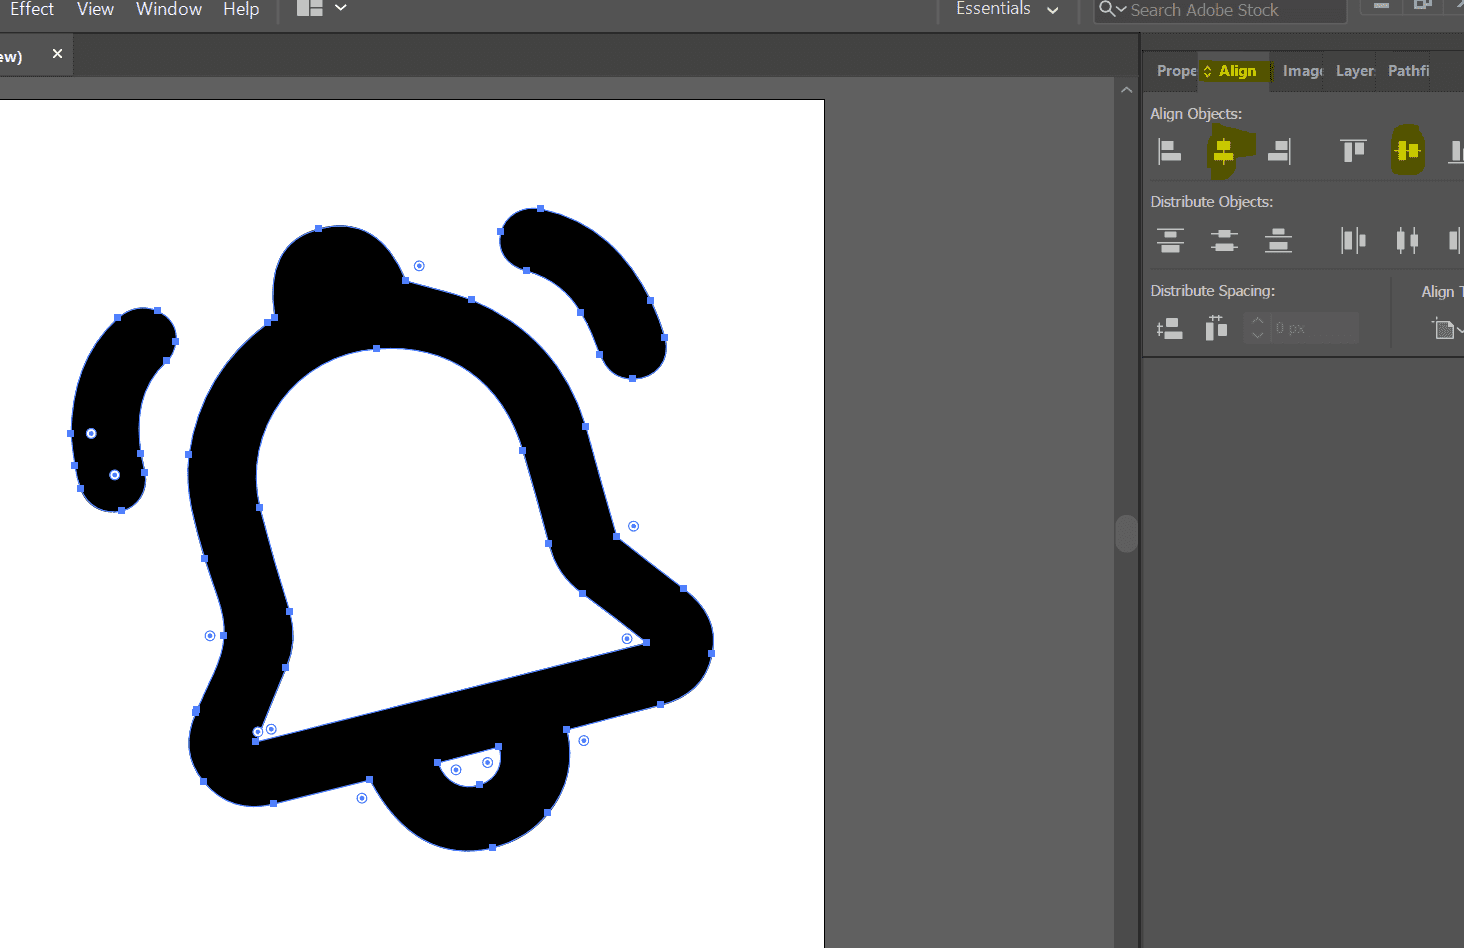
And we are done, now you need to export your SVG icon, by going to:
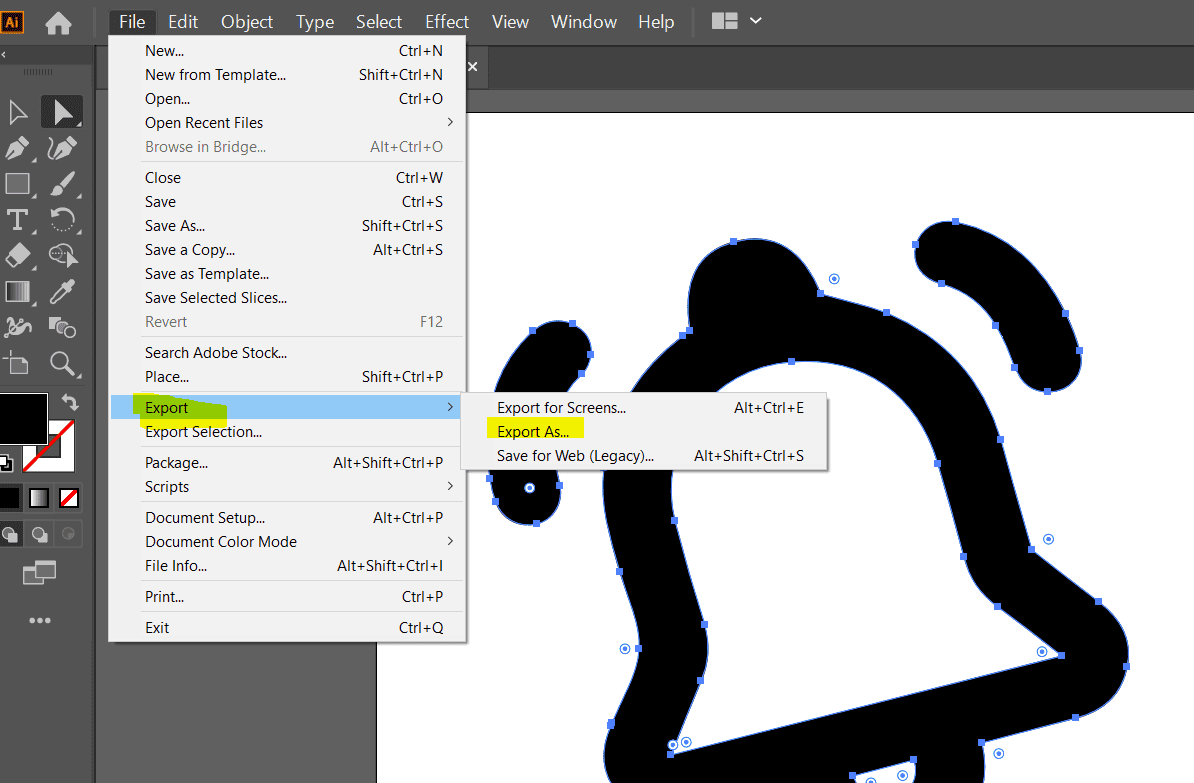
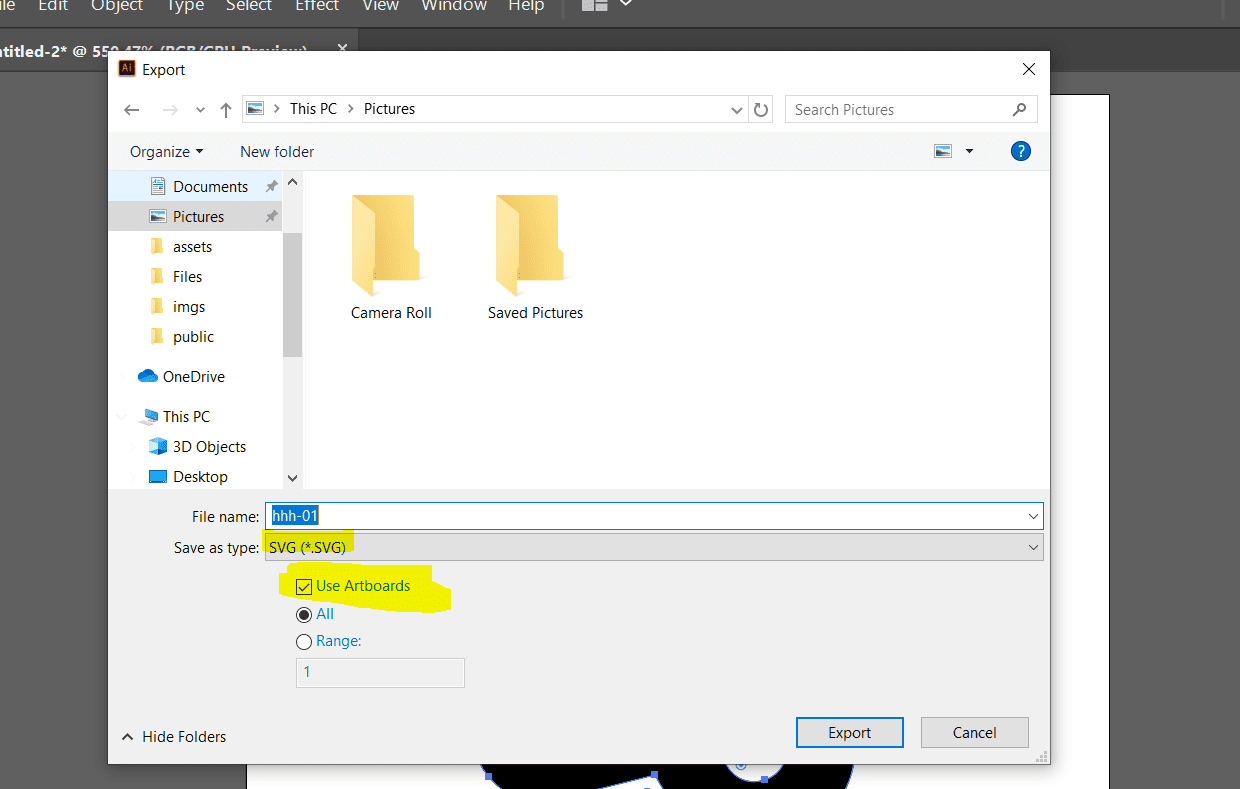
File -> Export -> Export As, while you export it, you need to select SVG as file type, and check Use Artboards, and then click Ok:
2. React Integration step
Now, you have the SVG icon ready to be used in our React application. Go to this file, and open it in visual code or any code editor, you must have something like the following code:
<svg id="Layer_1" data-name="Layer 1" xmlns="http://www.w3.org/2000/svg" viewBox="0 0 80 80"><path d="M37.9,11,0,0,0,3,2....."/></svg>
Now, within your React application, create a file inside components/icons called NotificationIcon.jsx, and create a normal component by putting the content of SVG icon as component body:
function NotificationIcon({ ...props }) {
    return (
      <svg {...props} version="1.0" xmlns="http://www.w3.org/2000/svg" viewBox="0 0 80 80">
         <path d="M37.9,63.2,29,65.43a6.13,6.13,0,0,1-6.55-2,5.62,5.62,0,0,1-.72-6.4c0-.08.06-.17.1-.26.9-2.29,2.41-4.55,2.53-6.88s-1.14-4.74-1.82-7.11c-.91-3.17-1.88-6.32-1.41-9.71A17.67,17.67,0,0,1,28.46,20.8c.22-.16.43-.34.62-.48-.71-4.62.66-7.33,4.12-8.26,3.65-1,6.38.71,8.07,4.87a56.79,56.79,0,0,1,6.08,1.79,17.53,17.53,0,0,1,10.56,11.7c1,3.39,1.93,6.79,2.91,10.28,2,1.58,4.13,3.22,6.25,4.82s3.11,3.46,2.6,6a5.89,5.89,0,0,1-4.74,4.74c-2.87.23A3,3,0,0,0,65.28,22.17Z"/>
      </svg>
    );
  }

export default NotificationIcon;
Now our icon component is ready to be used, but this time not as an image, but as a component, and we can pass our props to it like width and height and classes. Here is an example:
import NotificationIcon from '../components/icons/NotificationIcon'
..

function NotificationBox() {
   return (
      <div>
         <h2>An example of using icons as components:</h2>
         <NotificationIcon width={46} height={46} className="header-main-notification-icon" />
      </div>
   )
}

export default NotificationBox
Comparison between image and icon concerning performence
In the following comparison, I deliberatly get the previous example by increasing a little bit the dimensions to show you the quality difference between using image and SVG icons:
Image icon:

Svg icon:
Conclusion
Using SVG icons on your React or any other type of application, Improve the performance and the user experience, especially when the dimensions change from place to place, and reduce the amount of files requested from the server. I was working with this strategy for more than 3 years now, and I won’t lie that it helps me a lot, and I want to share it with you, and I hope you find something useful.
Happy coding 🙂